CMass lives inside Gmail — there's no new tool to learn and no separate dashboard to log into. Once the Chrome extension is installed, a CMass button appears next to the Send button in every compose window. This guide walks you through the whole process from zero to sent.
Step 1: Install CMass from the Chrome Web Store
CMass is a Chrome extension. Open the Chrome Web Store, search for 'CMass', and click 'Add to Chrome'. The install takes about 10 seconds. Once it's done, a small CMass icon appears in your Chrome toolbar.
Step 2: Sign in with Google
Click the CMass icon in your toolbar. You'll see a 'Sign in with Google' button. Click it and choose the Gmail account you want to send campaigns from. CMass will request permission to send emails on your behalf — this is required for the extension to work.
Step 3: Open Gmail and compose a new email
Go to mail.google.com and click the Compose button. A compose window opens in the bottom-right corner of the screen. At the bottom of the compose toolbar, you'll see the CMass button next to the Send button.

Step 4: Click the CMass button
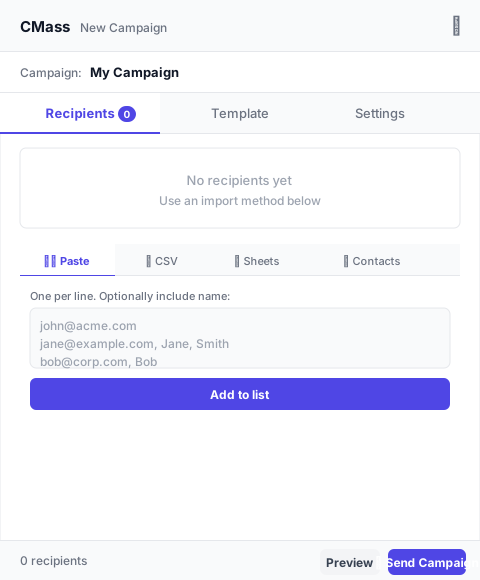
Click the CMass button to open the campaign panel. It slides in from the right side of the screen. The panel has three tabs: Recipients, Template, and Settings.
Step 5: Add your recipients
In the Recipients tab, you can add contacts four ways:
- ▸Paste — type or paste email addresses directly, one per line
- ▸CSV — upload a spreadsheet exported from any CRM or tool
- ▸Google Sheets — link a live Sheet directly
- ▸CMass Contacts — import from people you've emailed in Gmail before
For your first campaign, the Paste method is the fastest. Type a few email addresses and click 'Add to list'. You'll see them appear in the recipients table.
Step 6: Write your email
Click the Template tab. Fill in the Subject line and the email body. If you have a first name column in your contact list, you can use {first_name} to personalize the greeting. The merge tag autocompletes as you type — start with a { and CMass shows available tags.
Step 7: Send a test (optional but recommended)
Before launching, go to the Settings tab and enter your own email address in the 'Send Test Email' field. Click 'Send Test' — you'll receive the email with sample merge tag values filled in so you can check how it looks in a real inbox.
Step 8: Launch the campaign
When you're happy with everything, click the '🚀 Send Campaign' button at the bottom of the panel. CMass creates the campaign, queues the emails, and starts sending through your Gmail account. You can track progress and see opens and clicks in the CMass popup (click the toolbar icon).
What's next?
- ▸Learn about merge tags to personalize every email
- ▸Set up automated follow-up sequences
- ▸Connect a Google Sheet for larger contact lists
- ▸Turn on AI personalization to have Claude write custom opening lines