There are two fundamentally different ways to put an image into an email, and the difference affects deliverability, email size, and whether your open tracking works. This guide explains both — and how CMass handles images for you so you don't have to think about it.
The two ways to add an image to an email
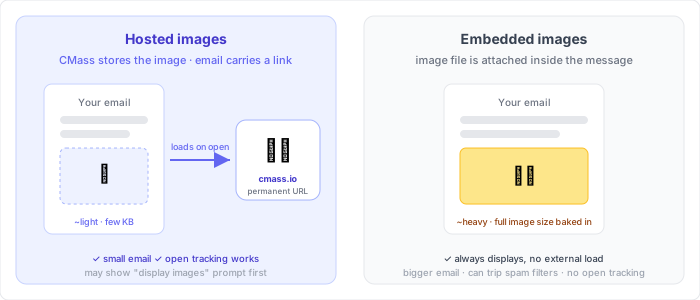
Hosted (linked) images
A hosted image lives on a web server. The email itself doesn't carry the image file — it carries a small HTML <img> tag that points to the image's URL. When the recipient opens the email, their email client fetches the image from that URL and displays it. This is how the vast majority of marketing and bulk email works.
Embedded (inline) images
An embedded image is baked directly into the message — the actual image file travels inside the email as an attachment (technically a 'multipart/related' MIME part referenced by a CID, or a base64 data URI). Nothing is loaded from the internet; the image is already there when the message arrives.
Which one should you use?
For bulk and cold email, hosted images are almost always the right choice. Here's the trade-off:
Hosted images — pros
- ▸Tiny email size — the message stays a few KB no matter how large the image is
- ▸Open tracking works — the same image-load mechanism powers CMass's open tracking
- ▸Faster sending and lower spam risk — small, text-light emails are treated better by filters
- ▸One image, served to everyone — update or reuse it without re-attaching
Embedded images — the catch
- ▸Every email carries the full image file, multiplying your total send size by the number of recipients
- ▸Large, image-heavy messages are more likely to be flagged by spam filters
- ▸Open tracking via that image no longer works, because nothing is fetched from a server
- ▸Some clients show embedded images as a paperclip attachment rather than inline
How CMass handles images
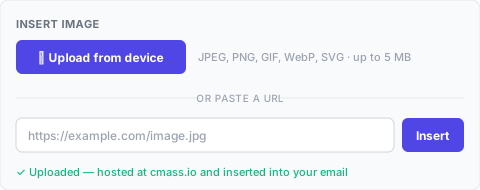
CMass hosts your images for you. When you upload an image from your device, CMass stores it on its own image hosting and gives you a permanent, stable URL — there's no expiring link, no third-party service, and nothing for you to set up. The hosted URL is what gets inserted into your email.
Upload a hosted image — step by step
- 1In the Template tab (or any follow-up stage), click '🖼 Image' in the media toolbar above the body
- 2Click '📁 Upload from device'
- 3Choose a JPEG, PNG, GIF, WebP, or SVG file — up to 5 MB
- 4CMass uploads it, hosts it on a permanent URL, and inserts it into your email body
Already have a hosted image?
If your image is already online (your own server, a CDN, or another host), you don't need to re-upload it. Paste its URL into the 'or paste a URL' field and click Insert — CMass adds it as a hosted image exactly the same way.
Recommended image sizes
CMass inserts every image with max-width set to 100%, so it scales to fit the width of the email — which is roughly 600 pixels in Gmail and most inboxes. The practical rule: design for a 600px-wide column, and export your source image at 2× (around 1200px wide) so it stays sharp on high-resolution 'retina' screens. Here's a quick reference by use case:
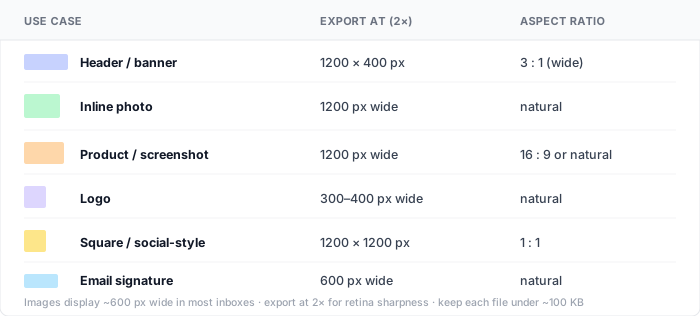
- ▸Header / banner: 1200 × 400 px source (shows ~600 × 200) — a wide 3:1 ratio reads well at the top of an email
- ▸Inline photo: 1200 px wide source at its natural height — the everyday content image
- ▸Product shot or screenshot: 1200 px wide source — keep text in screenshots large enough to read at half size
- ▸Logo: 300–400 px wide source (shows ~150–200) — use a PNG to preserve transparency
- ▸Square / social-style: 1200 × 1200 px source for a clean 1:1 block
- ▸Email signature image: 600 px wide source (shows ~300) — keep it small and light
Deliverability tips for email images
- ▸Compress before uploading — keep images under ~100 KB with TinyPNG or Squoosh for fast loading
- ▸Don't send an email that's one giant image — spam filters penalize image-only messages with little text
- ▸Keep a healthy text-to-image ratio — a few words of real text alongside each image
- ▸Always test on mobile — many clients display images at full width on small screens